Aerator Maintenance Guide
Our aerators will last you many, many years (some of ours around Cool Ponds are more than 10 years old!). But they are work horses and every couple of years they need a tune-up.
By the way, all the supplies mentioned can be found at our brick and mortar store and our online store.
We're going to look at both the PA and KA series. First let's look at the PA series.
First let's check to make sure there is air coming out of the compressor. Remove the air tubing and feel for air.
You won't feel a LOT of air, but you should feel equal amounts of air coming from each port. If you feel equal amounts of air from each port but you don't get many bubbles coming up from the air stones, then it's time to replace your air stones.

You can get more airstones here.
If you're getting no air out of any of the ports, then it's time to change the diaphragms inside the compressor. Don't worry -- this is much easier than it sounds! If you know how to use a screwdriver, then you can change diaphragms. (*If your air compressor is pushing no air out but is also completely silent, see the note at the bottom of this post.)

You can buy new diaphragm sets here.
Here's what a worn out diaphragm looks like (see photo below). Notice the big crack in the rubber. This is just normal wear and tear. Diaphragms normally need to be replaced every season or two.

If your aerator isn't working quite like it used to, use this guide to maintain your aerator.
By the way, all the supplies mentioned can be found at our brick and mortar store and our online store.
We're going to look at both the PA and KA series. First let's look at the PA series.
PA Series Aerators
 |
| PA 4 |
First let's check to make sure there is air coming out of the compressor. Remove the air tubing and feel for air.
 |
| Feel for air coming out of the compressor. |
You won't feel a LOT of air, but you should feel equal amounts of air coming from each port. If you feel equal amounts of air from each port but you don't get many bubbles coming up from the air stones, then it's time to replace your air stones.

You can get more airstones here.
If you're getting no air out of any of the ports, then it's time to change the diaphragms inside the compressor. Don't worry -- this is much easier than it sounds! If you know how to use a screwdriver, then you can change diaphragms. (*If your air compressor is pushing no air out but is also completely silent, see the note at the bottom of this post.)
You can buy new diaphragm sets here.
Here's what a worn out diaphragm looks like (see photo below). Notice the big crack in the rubber. This is just normal wear and tear. Diaphragms normally need to be replaced every season or two.
 |
| On this worn diaphragm, you can see that the rubber has split apart. |
In the video below, Kasey will walk you through changing the diaphragms. You can also see this written out in text with photos beneath the video.
 |
| Click the thumbnail above to see our video. |
Remove all four screws from the bottom of the aerator. Make a safe space for all these screws.
Per diaphragm set, there are three total screws you will be removing. First remove the two screws that hold down the plastic crossbar. Set these screws and the plastic crossbar aside.
Next remove the screw at the back of the diaphragm. Keep ahold of the little metal clamp too!

Put the new diaphragm in by slipping the nozzles on the end into the air tubing.
I find it helpful to put the back screw in first before the plastic crossbar. Sometimes I have to squeeze the back of the diaphragm together with needle nose pliers while I screw in the clamp and screw. Make sure you feel the screw thread into the threads at the bottom of the compressor.
Replace the plastic crossbar.
Since you're going through the trouble of opening up the compressor, it's a good idea to go ahead and replace both diaphragms (if you have a PA4), even if the other diaphragm set looks okay.
Screw the cover back on and replace the rubber caps. Done!
You may also want to check that the air valves aren't broken. They only need replaced if they're broken. You can purchase air valves here.
Also make sure that the air tubing isn't crimped or pinched anywhere.

Once again, first check air coming out at the compressor. If there is air, you may need to clean or replace the rubber membrane on your diffuser. You can soak the membrane in vinegar or try to scrub the algae off -- but sometimes it's just a little too far gone!
You can buy replacement membranes here.
To replace the membrane on a KA Mini diffuser (a single stick), you will need to cut the zipties off. New zipties are included in our spring refresh kit. For KA 1 and KA 2 diffuser plates, unthread the ceramic diffuser stick from the plastic plate.
Next remove the thick rubber bands on the diffuser stick
Slip the old membrane off and replace it with the new one.
If there is no air coming from the compressor, then you may need to replace the diaphragm. (*If your air compressor is pushing no air out but is also completely silent, see the note at the bottom of this post.)
You can find the KA Mini / KA 1 diaphragms here. And you can find the KA 2 diaphragms here.
Watch our video (click below) on changing the KA diaphragms, or see the text and photos below.
 |
| Remove all the screws from the bottom of aerator. |
Per diaphragm set, there are three total screws you will be removing. First remove the two screws that hold down the plastic crossbar. Set these screws and the plastic crossbar aside.
 |
| Remove both screws on either side of the plastic crossbar. |
 |
| Keep the plastic crossbar and two screws handy. |
Next remove the screw at the back of the diaphragm. Keep ahold of the little metal clamp too!

 |
| Set aside both the screw and little metal clamp. |
Put the new diaphragm in by slipping the nozzles on the end into the air tubing.
 |
| Put the new diaphragm in by slipping the nozzles into the air tubing first. |
I find it helpful to put the back screw in first before the plastic crossbar. Sometimes I have to squeeze the back of the diaphragm together with needle nose pliers while I screw in the clamp and screw. Make sure you feel the screw thread into the threads at the bottom of the compressor.
 |
| You will need two hands for this one: squeeze the plastic halves of the diaphragm together with a pair of needle nose pliers. Then use a screwdriver to thread the screw back in. |
Replace the plastic crossbar.
Since you're going through the trouble of opening up the compressor, it's a good idea to go ahead and replace both diaphragms (if you have a PA4), even if the other diaphragm set looks okay.
Screw the cover back on and replace the rubber caps. Done!
You may also want to check that the air valves aren't broken. They only need replaced if they're broken. You can purchase air valves here.
 |
| Air valve for PA series aerator. |
Also make sure that the air tubing isn't crimped or pinched anywhere.
KA Series Aerators
You can buy replacement membranes here.
To replace the membrane on a KA Mini diffuser (a single stick), you will need to cut the zipties off. New zipties are included in our spring refresh kit. For KA 1 and KA 2 diffuser plates, unthread the ceramic diffuser stick from the plastic plate.
 |
| Unthread ceramic diffuser from the plate. |
 |
| Remove the rubber bands from both ends of the diffuser to remove the silicone membrane. |
If there is no air coming from the compressor, then you may need to replace the diaphragm. (*If your air compressor is pushing no air out but is also completely silent, see the note at the bottom of this post.)
You can find the KA Mini / KA 1 diaphragms here. And you can find the KA 2 diaphragms here.
Watch our video (click below) on changing the KA diaphragms, or see the text and photos below.
 |
| Click the photo below or this link to watch our diaphragm changing video. |
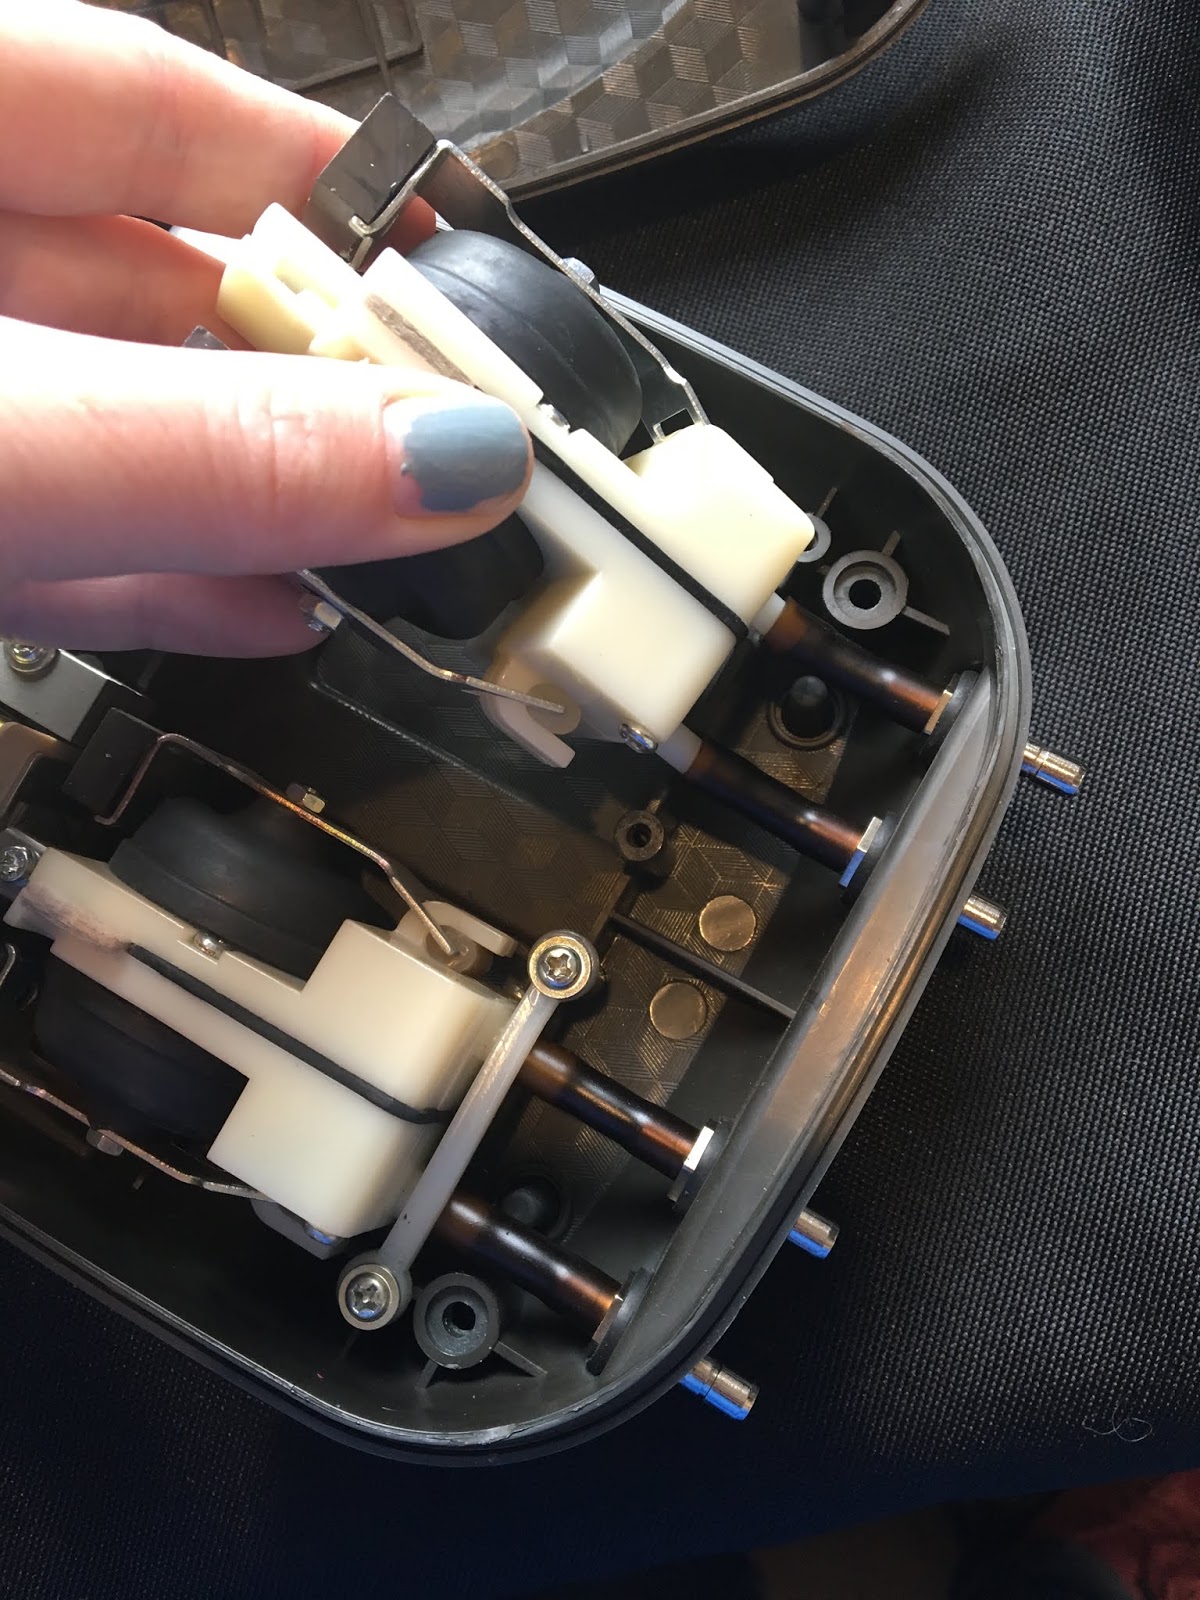
Remove all four screws from the bottom of the compressor. Keep a safe spot for all the screws and pieces.
Remove the tubing from each diaphragm (one on the back and one on the front). You don't need to disconnect the rubber tubing from the bottom of the compressor: just detach the tubing from the white plastic diaphragm.
Remove all four screws from each diaphragm (each side).
Use a small flathead screwdriver and wiggle the top piece of the diaphragm off. You will discard this piece. Do this on each side.
There is a teeny nut in the middle of each diaphragm. Remove this with a set of pliers. Set the nut aside -- replacements do not come with the new diaphragm kit.
Discard the thin and thicker plastic washers and the bottom part of the diaphragm.
I find it helpful when piecing everything back together to do the bottom parts of each diaphragm first. The magnetic center part of the compressor does shift back and forth, so pressing on each side as you assemble makes it easier to thread the nut back onto each side.
Place a plastic washer on first.
Then put one diaphragm bottom on. Make sure you put it on the right way! See the photo below.
Add another plastic washer and the thicker plastic washer, capping it with the nut.

Now move to the other side and repeat the process.
Add the top pieces to the diaphragms. Screw them back together.

Replace the tubing back onto the diaphragms.
Screw the cover back onto the compressor. All finished!
------
*If your air compressor is pushing out no air but also isn't making any noise at all, then it could be a couple issues. First, if your compressor shut off suddenly, then it might have overheated. It may even feel warm to the touch. Keep it unplugged for a few hours. It should start again on its own once you plug it back in. This is fail-safe feature in the electronics. Your compressor may need to be kept somewhere cooler, or it may need more air flow.
If your air compressor isn't making any noise but you know it hasn't overheated, you should check for moisture. Open up the compressor and look inside. If you notice any moisture, then I have some terrible news: your compressor is dead. The compressors need to be kept dry at all times.
------
The key to a long life for your aerator is keeping the compressor dry and giving the compressor plenty of air flow. Covering your aerator with a fake rock cover like ours is a good idea.
Here's some more information on aeration systems:
Why aerators are the best way to oxygenate your pond
De-icers vs. aerators -- what's best for winter?
Running a winter airline
You can shop all our aeration supplies at our brick and mortar store or our online store.
 |
| Remove the screws on the bottom of the KA compressor. |
Remove the tubing from each diaphragm (one on the back and one on the front). You don't need to disconnect the rubber tubing from the bottom of the compressor: just detach the tubing from the white plastic diaphragm.
 |
| Remove the rubber tubing from the diaphragms on either side of the compressor. |
Remove all four screws from each diaphragm (each side).
 |
| Remove the four outer corner screws from each side. |
Use a small flathead screwdriver and wiggle the top piece of the diaphragm off. You will discard this piece. Do this on each side.
 |
| Wiggle a flathead screwdriver to pry off the top part of the diaphragm. |
 |
| Here the top half of the diaphragm has been removed. |
There is a teeny nut in the middle of each diaphragm. Remove this with a set of pliers. Set the nut aside -- replacements do not come with the new diaphragm kit.
 |
| Use pliers to remove the nut from the center. |
 |
| Be careful to keep track of this tiny nut and washer. |
Discard the thin and thicker plastic washers and the bottom part of the diaphragm.
 |
| You can discard the existing plastic washers. |
I find it helpful when piecing everything back together to do the bottom parts of each diaphragm first. The magnetic center part of the compressor does shift back and forth, so pressing on each side as you assemble makes it easier to thread the nut back onto each side.
Place a plastic washer on first.
 |
| Place a thin plastic washer on first. |
 |
| Make sure you put this piece on in the correct orientation. |

Now move to the other side and repeat the process.
Add the top pieces to the diaphragms. Screw them back together.

Replace the tubing back onto the diaphragms.
Screw the cover back onto the compressor. All finished!
------
*If your air compressor is pushing out no air but also isn't making any noise at all, then it could be a couple issues. First, if your compressor shut off suddenly, then it might have overheated. It may even feel warm to the touch. Keep it unplugged for a few hours. It should start again on its own once you plug it back in. This is fail-safe feature in the electronics. Your compressor may need to be kept somewhere cooler, or it may need more air flow.
If your air compressor isn't making any noise but you know it hasn't overheated, you should check for moisture. Open up the compressor and look inside. If you notice any moisture, then I have some terrible news: your compressor is dead. The compressors need to be kept dry at all times.
------
The key to a long life for your aerator is keeping the compressor dry and giving the compressor plenty of air flow. Covering your aerator with a fake rock cover like ours is a good idea.
Here's some more information on aeration systems:
Why aerators are the best way to oxygenate your pond
De-icers vs. aerators -- what's best for winter?
Running a winter airline
You can shop all our aeration supplies at our brick and mortar store or our online store.


Comments